

Simple State Management using Redux Toolkit
Simplify Your State Management: A Beginner's Guide to Redux Toolkit

Hello, I'm a Frontend engineer with a passion for learning new tech, writing blogs, and sharing my knowledge with others.
Apart from coding, I love staying up-to-date with the latest trends and tools in the tech industry. I'm always learning and exploring new technologies and techniques to improve my work and create more efficient and scalable solutions.
I enjoy sharing my knowledge with others through writing blogs and creating courses. Recently, I created a course for Educative on React.
As a freelancer, I'm seeking projects related to Shopify and React. I enjoy working on projects that challenge me and help me grow as a developer.
In this blog we will create a simple application that will take the quantity from the user and with the click of a button will add that number to the cart also we will provide an empty cart button that will clear the cart quantity though the application is very simple it will serve our purpose to learn the basics of Redux toolkit.
Introduction to Redux
Redux is a predictable state container for JavaScript apps. It helps you write applications that behave consistently, run in different environments (client, server, and native), and are easy to test. Redux works by holding the whole state of your app in a single immutable store. The state of the app in the store is changed using a mechanism called actions which describes what happened and how the state should change. This is done through pure reducers which take in the current state and an action, then return the updated state.
Why do we need Redux?
In a typical React application, the state is managed by components. However, as the application grows in complexity, it can be difficult to keep track of what's going on with the state of each component. This can lead to issues such as state duplication and difficulty in debugging. Redux solves these problems by providing a single source of truth for the entire application, making state management easier to reason about and less error-prone.
Introduction to Redux Toolkit
Redux Toolkit is an official and comprehensive set of APIs to simplify redux application development. Redux Toolkit is designed to solve the common problems that users face when they use Redux like configuring the store, handling immutable updates, creating reducers, and more.
Redux Toolkit provides us with the various APIs that we will discuss and use in this Redux Series. I will keep explaining each one of them as we will proceed in our blog.
Application using Redux
This is how our final output will look:
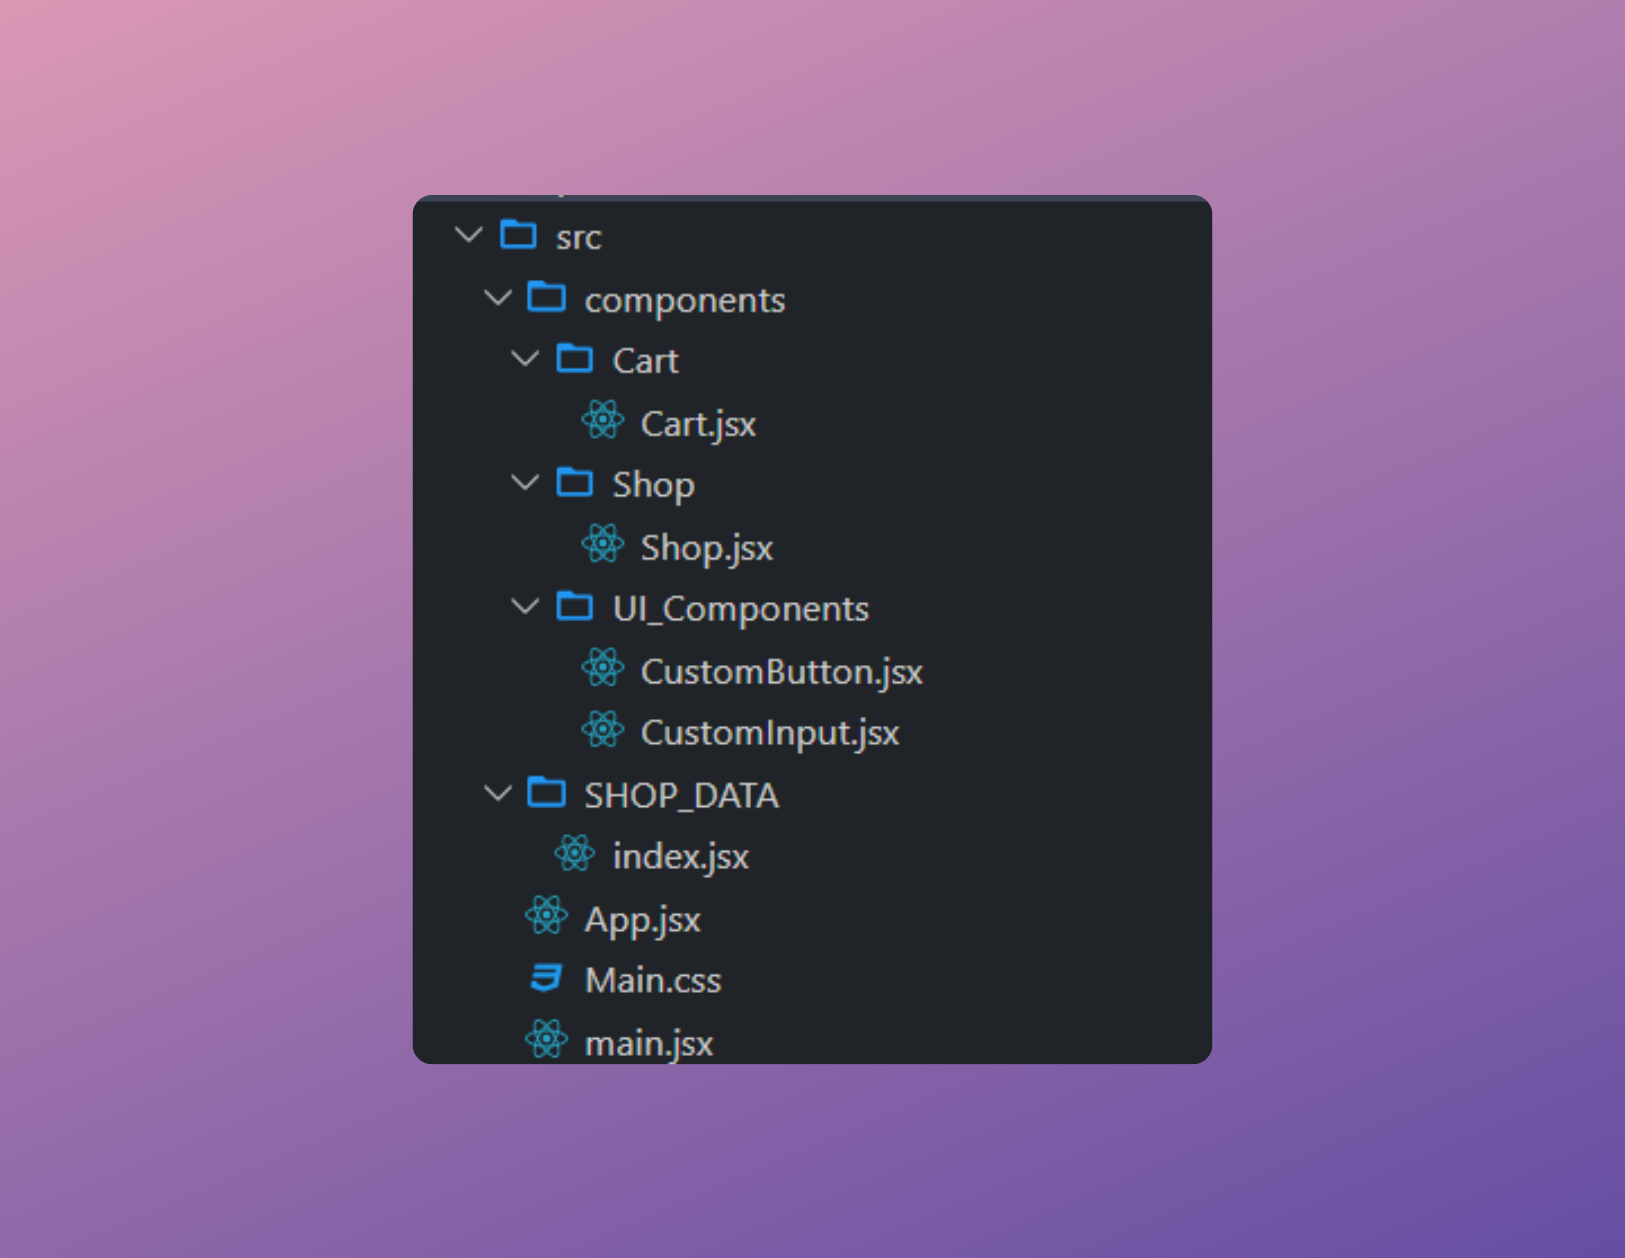
This will be our folder structure:
Before installing the packages you can create the react app. I have used the Vite on Stackblitz for this application.
Import all the packages used in the application using the following command.
npm i @reduxjs/toolkit bootstrap react-bootstrap react-redux
In the file
SHOP_DATA > index.jsxFirst of all, we will import
import { createSlice, configureStore } from '@reduxjs/toolkit';createSlicecreates the states for the different components in your app.configureStoreprovides you with all the state-updating functions called reducers and also provides you with the latest states that you can use in your component.Now we will create slices for our different components.
In the
createSliceobject we pass the name of the slice andinitalStatetakes all the initial states that will be updated by this slice.reducersare the object that takes that different state updating function.Here
add_items_to_cart(state, action)reducer will take thestateandaction.stategives us the latest state and it is used to update the states from theinitalStatethough it is advised not to directly mutate the states in React but Redux lets you do that because under the hood Redux uses the Immer that allows you to work with the immutable state more conveniently.actionis the only source of information for the store. It carries a payload of information from your application to the store. Here in our exampleactionwill contain the quantity of the cart.// Slice 1 = To update the cart quantity const initial_ATC_State = { itemsToAddToCart: 0, }; const ADD_TO_CART_SLICE = createSlice({ name: 'ADD_TO_CART_SLICE', initialState: initial_ATC_State, reducers: { add_items_to_cart(state, action) { state.itemsToAddToCart = action.payload; }, }, }); // Slice 2 = To hide the Add to Cart button const inital_empty_cart_state = { showATC: false, }; const EMPTY_CART_SLICE = createSlice({ name: 'Empty Cart', initialState: inital_empty_cart_state, reducers: { togglShowATCBtn(state) { state.showATC = !state.showATC; }, }, });Now we will export actions.
Actions give us access to the state updating function (reducers) so that we can change the state because in Redux we can not directly change the states. We use the actions to update the states. We will see further in the blog how to use actions.
  // Export actions
  export const atcActions = ADD_TO_CART_SLICE.actions;
  export const emptyCartActions = EMPTY_CART_SLICE.actions;
Now we will create our store that will provide all the reducers and the current state of our application.
configureStorehave thereducerproperty that takes the reducers from all the slices that we created.NOTE:
ADD_TO_CART_SLICE.reduceris not the error we pass all the reducers as the one parent reducer thereforeconfigureStoreprovides thereducerobject not thereducersobject.const Store = configureStore({ // reducer:ADD_TO_CART_SLICE.reducer (If we have only one slice) reducer: { atc_reducer: ADD_TO_CART_SLICE.reducer, empty_cart_reducer: EMPTY_CART_SLICE.reducer, }, }); export default Store;
In the file
main.jsxWe will wrap the whole application with the
Providercomponent that will take thestoreas the prop which will have the value of thestorethat we created above. This will help us to provide all the states and reducer in our app.import React from 'react'; import ReactDOM from 'react-dom/client'; import App from './App.jsx'; import 'bootstrap/dist/css/bootstrap.min.css'; import './Main.css'; import Store from './SHOP_DATA/index'; import { Provider } from 'react-redux'; ReactDOM.createRoot(document.getElementById('root')).render( <React.StrictMode> <Provider store={Store}> <App /> </Provider> </React.StrictMode> );In the file
Cart.jsxHere we will use the current state of the cart to show the quantity in the carts.
We use
useSelectorhook to get the value of the states. It provides us with the object that contains each state of the app. Since this is the object we will destructure it and get the latest value in theatc_reducer.atc_reduceris coming from ourconfigureStoreobject that we created above. Sinceatc_reduceris referring to theADD_TO_CART_SLICEwhich hasitemsToAddToCartvalue that gives us the quantity in the cart.import { useSelector } from 'react-redux'; const Cart = () => { const allStates = useSelector((state) => state); const { atc_reducer } = allStates; return ( <> <p className="text-danger">Items in 🛒= {atc_reducer.itemsToAddToCart}</p> </> ); }; export default Cart;In the
Shop.jsxfileIn this component, we will call the required functions that will update the state.
For that, we will import the actions from our store and will use
useDispacthhook of the Redux that lets you call the required reducer to update the states.import { atcActions, emptyCartActions } from '../../SHOP_DATA/index'; import { useSelector, useDispatch } from 'react-redux';Now we will use the
dispatchfunction which will take our actions that will have the required function reducer to update our state.For example:
We will dispatch the
atcActionson the click of the Add to cart button that will call the functionatcHandlerthat has the functionadd_items_to_cartthat takes the payload that will be used as the quantity of the cart. Same we will do to toggle the state of showAtc button.// To add quantity dispatch(atcActions.add_items_to_cart(totalItems)); // To toggle the state dispatch(emptyCartActions.togglShowATCBtn());import CustomButton from '../UI_Components/CustomButton'; import CustomInput from '../UI_Components/CustomInput'; import { useRef } from 'react'; import { atcActions, emptyCartActions } from '../../SHOP_DATA/index'; import { useSelector, useDispatch } from 'react-redux'; function Shop() { const inputRef = useRef(0); const dispatch = useDispatch(); const allStates = useSelector((state) => state); const { empty_cart_reducer } = allStates; const atcHandler = () => { const totalItems = inputRef.current.value; dispatch(emptyCartActions.togglShowATCBtn()); dispatch(atcActions.add_items_to_cart(totalItems)); }; const emptyCartHandler = () => { dispatch(emptyCartActions.togglShowATCBtn()); dispatch(atcActions.add_items_to_cart(0)); }; return ( <> {!empty_cart_reducer.showATC && ( <> <CustomInput reference={inputRef} /> <CustomButton onFuncDispatch={atcHandler} title="Add to Cart" color="primary" /> </> )} {empty_cart_reducer.showATC && ( <CustomButton onFuncDispatch={emptyCartHandler} title="Empty Cart" color="warning" /> )} </> ); } export default Shop;
The complete code with the Live Demo can be found here.
With this, we have completed our application using Redux as the state management. This all might feel overwhelming initially which no doubt it is.
Before using Redux I would advise you to learn the concept of useContext the React inbuilt state management API that will help you understand the state management. Here is my blog on the same Learn useContext API . This blog will help you create the mental model for state management using Context API.
In the next blog, we will discuss How to handle the async states in the Redux using createAsyncThunk
Thank you for taking the time to read my blog post! I hope you found it informative. If you're interested in more tech-related content, be sure to follow me on 🔗 Linkedin 🔗 Hashnode. Thanks again for reading the blog, and I look forward to sharing more with you soon!


