


Welcome back again!
This is the third blog in the React Hook series, where we're learning about different hooks used in React, and our today's hook is the useContext hook. Before we get started, I'd recommend reading the last blogs of this series React Hooks . Though this hook is completely independent of we can read and learn it without any prior knowledge of hooks, it would be beneficial to have some basic understanding of the hooks.
What is the useContext Hook
Until now, we've learned that if we need to pass state from one component to another, we must do so via props.
This method of passing the state through the props is called prop drilling.
However, passing the state with props is only useful for small applications; as our application grows in size, the number of components grows as well, making prop drilling ineffective.
The useContext hook comes to our rescue because it offers state at a global level, making it simple to give state directly to the component rather than passing it through many components.
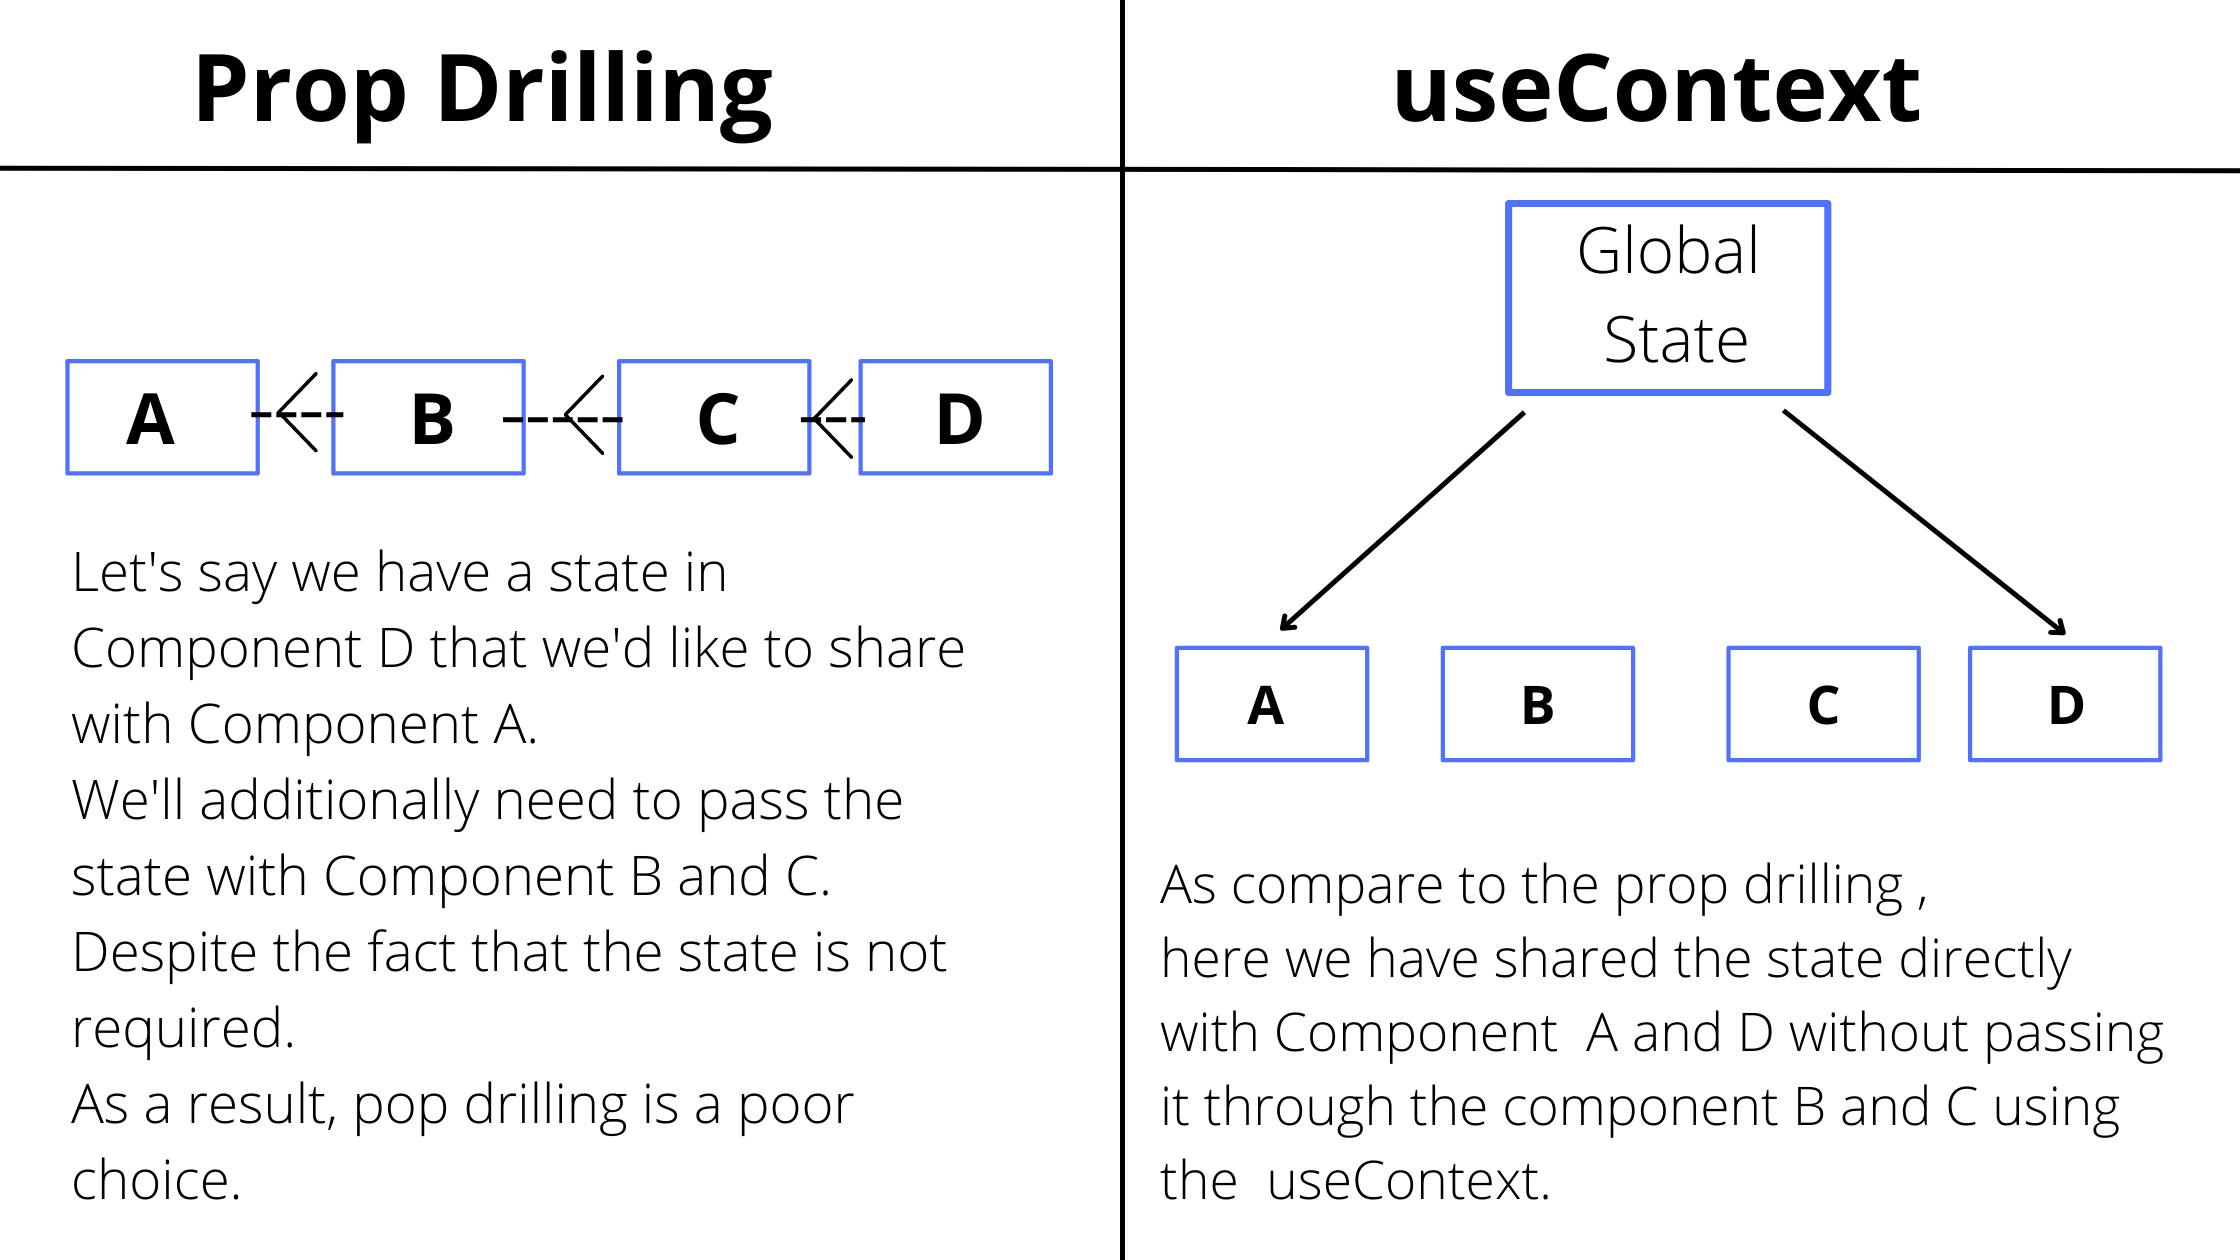
Example of Prop Drilling
Though the state was not necessary for the ComponentB and ComponentC in the following widget, this is the only way to move the state from one component to another without using the useContext method.
Use useContext Hook
We're going to make a simple counter app with three components, each of which will update the global state of the counter. The three components are Increase, Decrease, and Reset.
useContext will be used for all of this state updating and providing count value back to the components.
Easy method to remember the flow of useContext:
Create > Provide > Use
Now we will learn step by step to use and create useContext :
Step 1 (Create)
Always prefer to create a separate Context.js file in the src folder to use the useContext.
As told in the above flow, our first step would be to create the useContext hook. In the following snippet, we will import the different hooks and function to create the context. We use createContext function to create the context.
// Context.js

import React, { useState, createContext, useContext } from "react";

const CounterContext = createContext();
Step 2 (Provide)
Now we will use the above CounterContext and wrap our whole application to provide the values to every component.
// Context.js

export const NameContextProvider = ({ children }) => {
  const [counter, setCounter] = useState(0);
  return (
    <CounterContext.Provider value={{ counter, setCounter }}>
      {children}
    </CounterContext.Provider>
  );
};


// index.js

import { NameContextProvider } from "./Context";
import App from "./App";

const rootElement = document.getElementById("root");
ReactDOM.render(
    <NameContextProvider>
      <App />
    </NameContextProvider>,
  rootElement
);
Because we wrapped our application in the index.js file using the NameContextProvider, children will be our application in the above snippet. To build the state, we're using a simple useState hook. The component Provider in the CounterContext.Provider></CounterContext.Provider> helps the context deliver state values to all the components that have been wrapped around. The value of all the states and functions that we want to share with components is referred to as value In the value field, we can put anything we want.
Step 3 (Use)
Now the last step is using the context we have created using the useContext hook.
// Context.js

export const UseCounterContext = () => useContext(CounterContext);
Note: Always remember to export the
UseCounterContextandNameContextProvider.
These were the steps for creating the context.
- Now all we have to do is create the various components and use this state value to update the state value as needed.
We'll make three separate components: one to increase the value, one to decrease the value, and one to reset the state's value to zero.
I will show only one component in the following snippet all other components will follow the same method with some changes in the state updating function
setCounter.
// Increase.js

import { UseCounterContext } from "./Context";

const Increase = () => {

  const { counter, setCounter } = UseCounterContext();

  const increaseHandler = () => {
    setCounter((prevValue) => prevValue + 1);
  };

  return (
    <div className="component">
      <h3>I am counter {counter} in ComponentA</h3>
      <button onClick={increaseHandler}>Increase</button>
    </div>
  );
};

export default Increase;
To utilize the value of the context we have to import the UseCounterContext which we created in Step 3 (Use) of the context. After importing the UseCounterContext we will destructure all the values passed in values in the Context.js file. Since we passed the counter and setCounter and we need only these values in our component so we will destructure these values and use them in the component.
Note: We can destructure only those values that we are going to use in the particular component. Since the above snippet is for
Increase.jscomponent we will increase the value of thecounterusing thesetCounterfunction.
Create the Decrease.js and Reset.js functions similarly.
Here is the final codesandbox.
Ending
Always remember to follow the flow of the context ie
Create > Provide > Use
That's all for this blog. Continue reading this React hook series to learn more about React hooks. In the next blog, we'll look at the 'useContext' hook, which is used to handle state management in React globally. Feel free to leave your valuable feedback in the comments below.
To learn more about React, JavaScript, and Web development, follow me on Twitter.
Reference: W3Schools